Pages

Saturday, December 20, 2014

Any Cookie Spread

I'm always looking to experiment with the not so pretty and broken bits of cookies that come with holiday baking. Recently, I was noodling nut butter ideas and a connection was made.

Pepperoni Salted Ginger Snap Peanut Butter

Why not make a cookie butter? It should have been obvious after having experienced Biscoff Spread. It's a delicious speculoos cookie spread. If you haven't tried it, I highly recommend getting a jar to enjoy. Be careful not to eat the entire container in a sitting.

I spun up the food processor with ginger snaps until they were crumbs. Next I added peanut butter & continued spinning until it was thoroughly mixed. This was followed by drizzling oil until it became a spreadable consistency. I balanced the base flavor with pepperoni salt and a touch of honey. The result yielded a delicious so wrong so right moment. Once you try it, you'll understand.


The Needs
  • Food processor
  • Broken and ugly cookies
  • Nut/seed/dairy/other butter (optional but recommended)
  • Matching or neutral flavored oil
  • Any complementary salt in concentrate, powder or granule form
  • Sugar syrup like honey/maple/whatever makes sense

The Method
  • Process cookies to yield 2 cups of crumbs
  • Add 1/8 cup butter of your choosing & process until fully incorporated
  • Drizzle oil while processor is spinning until it reaches a spreadable consistency
  • Add salt to taste
  • Supplement with syrup as needed
No hard and fast rules when it comes to the method. Follow your taste buds as you spin the ingredients.


I look forward to seeing what you come up with to keep the ideas bouncing.  

Wednesday, December 10, 2014

Puzzle Pieces of Passion

Passion is commitment. You strive to understand every single detail of how to be better at that thing you do no matter how miniscule. You are willing to seek it out at costs that most can't fathom. You don't sleep much because that's time away from the pursuit. When you do sleep, your brain is post processing ideas that will eventually become the inspirations and breakthroughs to fuel the fire. The beast needs to be fed with study, practice, experiments and experiences. It's an addiction you will never shake.

Passion has no space for stuff. The only material objects you accumulate are tools, equipment, references and notebooks in the pursuit of excellence. Some pieces have exceptions due to fond memories of who handed it down to you, that feeling of accomplishment when you first picked up a new skillset, where you discovered it for the first time and the list goes on. You can live without things because it's the knowledge that fulfills. That's the stuff you're made of.

Passion overwhelms. You've experienced the glazed over look when you can't stop talking about a new discovery when someone asks. You have a religious schedule that cannot be broken by just about any occasion. People who know you well enough don't ask you to party. Your significant other has given up on asking you to come to bed if you have one at all. It's not for everyone.

Passion connects. Most everyone in this camp is open to different perspectives and has a willingness to share experiences. It's just about impossible and ridiculous to become proficient without guidance. All you have to do is show true interest and it will open some serious doors. They're all doing the work here and you won't be disappointed. It's the family you've been looking for.

Passion yields identity. All the hard work, perseverance and stress brings your biggest obstacle to the forefront, yourself. You gotta dig deep and deal with those demons. Discovering who you truly are is where this path is headed. You only have a limited time here so make it your own.

Tuesday, December 2, 2014

Cranberry Kimchi

I couldn't help but kimchi cranberries because I was a bit tired of the typical fruit sauce variations. Having done a lot of kraut and kimchi experiments with all sorts of vegetables, it only made sense to try a fruit.

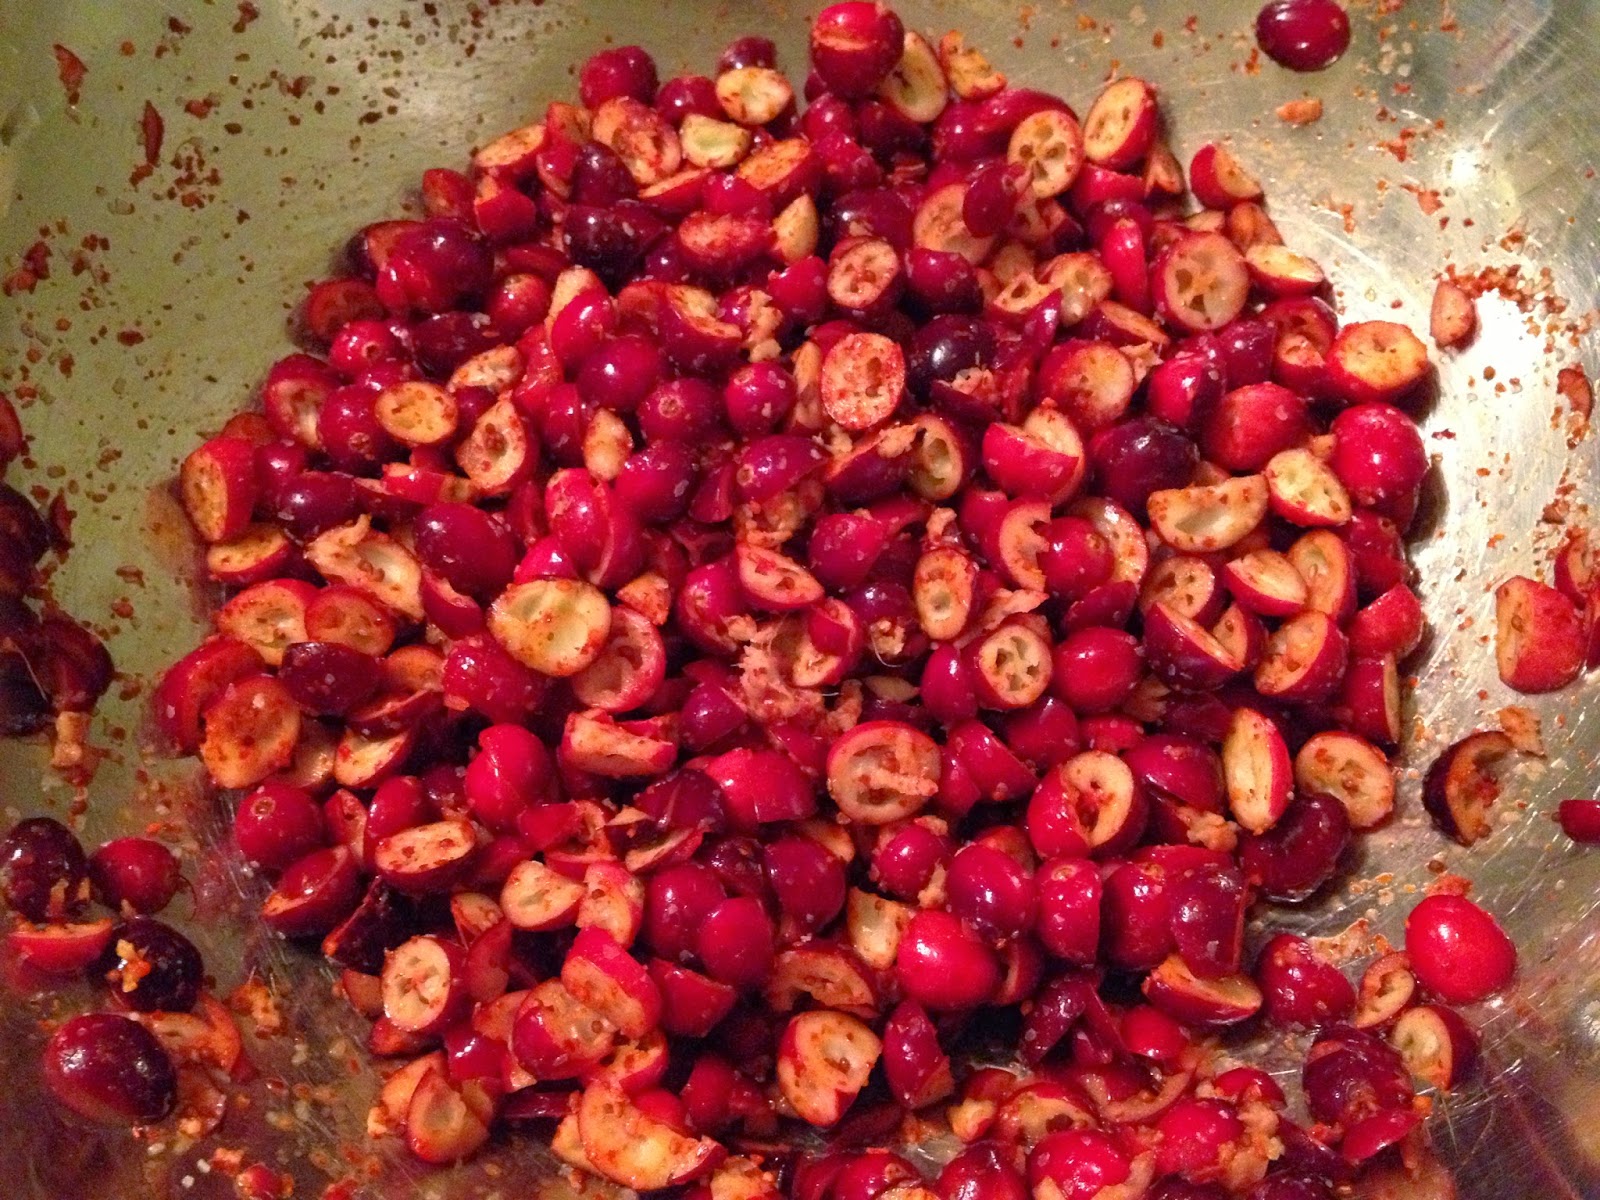
Kimchi Seasoned Chopped Cranberries

I stripped out all of the savory components so it would be centered on the cranberry flavor and more versatile. Technically closer to a kraut or hot sauce ferment, but kimchi sounds better.

Mashed Cranberry Kimchi Mix

The Needs
  • 1 wide mouthed pint canning jar
  • 1 potato masher or rolling pin and gallon zip top bag
  • 300g fresh cranberries
  • 7.5g salt
  • 1T freshly grated ginger 
  • 1t gochugaru (Korean chili pepper powder)
  • Cranberry or orange juice as required

The following steps assume that you're familiar with this type of fermentation and understand how to maintain it. If you've never made sauerkraut or kimchi before, I strongly suggest trying Sandor Katz's recipe first.


The Process
  • Rough chop cranberries and add to a large bowl
  • Add salt, ginger and chili powder
  • Mash the cranberries until they're all compressed and juices are flowing
  • Compress the mash into a wide mouthed pint canning jar
  • Make sure the liquid covers the solids
  • If it doesn't, add a little juice, mix it with the mash and compress it back down until it does
  • Allow to ferment for at least one month or until you're happy with the flavor

I hope this inspires you to consider fermenting all sorts of fruits in the kimchi fashion. As always, please share your experiments to keep the ideas bouncing.

Saturday, November 29, 2014

Flamed Satsuma Peel Marmalade

Marmalade is amazing because it utilizes the entire fruit to harness an array of flavors and textures. It only made sense to give Satsumas a go when they showed up this season.

Searzall Charred Satsuma
As with all of my investigations, there's a twist (pun intended). I couldn't help but wonder if using the cocktail method of flaming the orange peel would enhance the flavor. The key was figuring out a way to capture the aromatics so squeezing the peel to ignite the citrus oil was out. The Searzall sitting on my counter was the obvious answer. I lit it up and torched the Satsuma whole. It smelled pretty awesome and knew that I was onto something.

Plump and Warm Satsuma Post Peel Torching
Fresh Satsumas are addictive because they're easy to peel, crazy sweet and seedless. When I bought them for this project, I ate so many that my tongue went numb. The aromatic zest and scant amount of pith brings down the bitterness that you'd expect in a traditional orange marmalade. The membranes are so delicate there's no need to separate them in a muslin bag to extract the pectin.

Sliced Satsuma and Ribbons of Charred Peels
After I torched the mandarin, I peeled off the skin. Then I sliced the orange, did up a chiffonade on the peels and put them into a medium sauce pan. I cut the sugar down to 1/3 what's called for in a standard marmalade. The intent was to highlight the flavors instead of drowning them out with sweetness. You end up with a refrigerator jam that can't be put up but that's ok.

Flamed Satsuma Peel Marmalade
After it was cooked down and cooled, I tasted it. The Satsumas shined with a toned down bitterness. There were also smoky & burnt notes that came through from the charred peel. The ribbons of zest didn't hold together as much as a traditional, but it still had plenty of texture contrast. It was everything I hoped it would be.

Now go forth and make marmalade with any citrus you enjoy eating fresh. There's also something to be said for using the flavorful parts that would otherwise be tossed. It harnesses an indescribable complexity that by default matches the fruit. Also, don't forget to char all the citrus or any fruit for that matter prior to making a fruit preserve. So many possibilities...


The Method
  • Start off with a marmalade recipe of your choice (Here's AB's)
  • Scale the recipe down to make 1 pint or whatever amount you can use up in a couple weeks
  • Cut the sugar content down to a third
  • Simmer until most of the water is driven out before you kick up the heat to get to temperature
  • Once it's cool, refrigerate
  • It should last for at least a couple weeks in the fridge

As always, let us know how this inspires you to keep the ideas bouncing.

Tuesday, November 18, 2014

Carbonated Posset Pudding

I was intrigued by a posset dessert that @verysmallanna posted a while back. I had no idea what it was until I did some research. It sounded wonderful so I convinced her to share the recipe with me and started experimenting.

Carbonated Riesling Vinegar Posset

What is a posset? In this case, it's a simple pudding made with just three ingredients: cream, sugar and lemon juice. The thickening is driven by the acidity of the citrus curdling the milk.

Carbonated Posset Foam on Top

Of course, I couldn't just do it straight up. I happened to be experimenting with carbonation at the time and wanted try a dense liquid. The posset was the perfect candidate. The variation didn't stop there. I replaced the citrus juice with a killer Minus 8 vinegar based on a previous success with vinegar sherbet. I settled on Dehydr8, a Riesling raisin vinegar. It was sure to shine through the richness.
 
Creamy Carbonated Posset Underneath

After I prepared the posset, it went into the whipping canister hot. I allowed it to cool to the touch uncovered. Then I double charged it and refrigerated overnight. The next day I discharged and opened the canister to taste that the posset successfully carbonated. The flavor and texture are best described as a delicious grape creamsicle float pudding. The Dehydr8 vinegar gave it character and depth beyond what any citrus juice could do. As an added bonus, there were two distinct layers consisting of a foam layer on top and carbonated pudding underneath. I was amazed by how the straightforward carbonation process created such a wonderful texture combination. After tasting, I couldn't help but think about the potential for applying this technique to all sorts of puddings and custards. So it begins...


The Needs
  • 1 pint whipping canister
  • 2 CO2 charges 
The Ingredients*
  • 200g heavy cream (not ultra pasteurized)
  • 50g sugar
  • 3T high quality vinegar
  • Pinch of salt
The Steps*
  • Add the cream, sugar and salt to a small pot
  • Bring to a boil while constantly whisking
  • Remove from heat
  • Whisk in vinegar
  • Immediately pour into the whipping canister
  • Wait until the canister is cool to the touch
  • Charge the posset and carefully swirl so the liquid doesn't contact the top. It's pretty thick and you want to prevent a blockage.
  • Repeat with a second charge
  • Refrigerate overnight
  • Discharge the canister upright. The posset is too thick to pass through the nozzle. There should only be gas releasing from the top.
 * The ingredient ratios and steps for making the posset base are from @verysmallanna.


As always, please share your experiments to keep the ideas bouncing.

Saturday, November 15, 2014

Searzall the Sweets

I'm always inspired by new techniques to achieve delicious results. So when Dave Arnold of Cooking Issues posted a Kickstarter on the Searzall, I backed it immediately.

Searzall Flame On!

What is a Searzall? For industry folks, it's a torch attachment that diffuses the flame to eliminate off flavors, AKA torch taste. Primarily used to finish sous vide and low temperature cooked meats. For adventurous home cooks out there, an Eater article has described it as a hand-held broiler. All in all, it's portable intense heat on demand for searing anything to your heart's desire.

I didn't plan ahead when the unit arrived so there wasn't any meat ready for the treatment. Of course I couldn't wait to get it fired up. That left me thinking about what would benefit from applying crazy heat to? Sugar was the answer.

Searzall Candied Fennel
I happened to have some candied fennel kicking around. The caramelization added a level of complexity that was pleasant. It was good but not amazing.


Searzall Malted Milk Powdered Baby Corn
Inspired by elote and grilled corn, I dusted baby corn with malted milk powder. The seared malted milk powder was freaking delicious. Not to mention the roasted corn aroma.


Searzall Malted Milk Powdered Caramel Apple
After testing a caramel apple recipe, it got the malted milk powder treatment. Ridiculously good.


Caramelized Malted Milk Powered Gingerbread

With that method under my belt, it was waiting for a dessert application. Recently, I was coring out centers of cut gingerbread squares for filling and had the light bulb moment. The caramelized malted milk gingerbread nugget was born. It's a flavor and texture extravaganza. A description wouldn't do it justice. You'll have to wait until it's on the Mei Mei Street Kitchen menu again or buy a Searzall and try it yourself.


The Process
Warning: Before you use a Searzall, please be sure to read and follow all the instructions provided especially those relating to safety. It's a wonderful piece of equipment, but can be dangerous if used improperly.

  • Dust small rounds of cake with malted milk powder. In fact, this will likely work with anything that has a cake-like structure and anything with sugar in a dust or fine granule form.
  • Set up a wire cooling rack over a sheet pan on a surface that can handle the heat.
  • Set parchment paper on another sheet pan for the finished pieces.
  • Place one of the rounds on the wire rack on its side.
  • Light up the Searzall.
  • Move the head of the Searzall back and forth over the cake until the milk powder caramelizes. Bank on incinerating one or two to figure out the optimal height and duration of exposure.
  • Rotate the round and repeat the process until all sides are caramelized. You should use a spoon or tool to push the cake around so you don't burn your fingers like I did.
  • Place the round of cake on each end to finish the ends.
  • Place the finished piece on its side and allow it to cool. 
  • Cycle through the remaining pieces until you're done.
  • Suggest eating them with a fine drizzle of smoked dulce de leche on top.

Pre Searzall Malted Milk Powdered Gingerbread

Post Searzall Malted Milk Powdered Gingerbread

For more details on how the Searzall works, check out the Booker and Dax Lab YouTube channel. The Searzall has a ton of potential and I'm looking forward to seeing all the applications folks come up with.

As always, I hope this idea inspires you to create and keep the ideas bouncing.

Saturday, September 6, 2014

Kojify All the Grains

Homemade koji has been on my list for a while. It was serendipitous when @geofflukas asked me to figure out the process for his fermentation focused brunch.

What is koji? It's the Japanese term for the mold Aspergillus oryzae. Scratching the surface, koji is used to ferment soy beans for soy sauce and miso. It also has the power to convert rice carbohydrates to sugars for sake. I encourage you to research and discover all the delicious products that are based on koji. You'll be amazed.

Popcorn Koji, Not a Blurry Pic
Searching for DIY options, I discovered @fermup's incubator to make koji and tempeh. I got in contact with @brandenbyers who generously provided everything I needed to make A. oryzae flourish. His help was key to my success.

The incubator only consists of four components: large cooler, aquarium heater, aquarium bubbler and 2" hotel pan (standard stainless steel tray that restaurants use). It is dead simple to put together and requires no customization. Then all you have to do is fill it with water, turn it on, set your hotel pan filled with grain/legume mixed with koji starter on the top, cover and wait.

Incubator Rig in Action
The incubator performs extremely well based on two important factors. The cooler's insulated environment allows for the temperature and high humidity to be easily maintained. The water bath at the bottom of the cooler provides heat capacity to keep the temperature rock solid as well as a reservoir for the humidity.

Thai Jasmine Rice with Koji Starter
Aside from tight controls on the environment, maximizing surface area is paramount for mold development. Prior to inoculation, the grains are "under cooked" so they remain separate and don't stick together. Long grain Thai Jasmine rice fit the bill.

Thai Jasmine Rice Koji
When the koji is done, you'll see a layer of white, fuzzy mold on top of the rice as seen in the clumps in the picture above. In my excitement, I didn't snap a shot until after I started breaking it up. The finished Jasmine koji smells and tastes amazing. Sweet and delicate. It was an excellent rice choice for the first run due to its high amylose content. Perfect for horchata.

Wetted Down Popcorn with Koji Starter
I went through my pantry to find a grain that maximized surface area for the koji to eat. Popcorn kernels were at eye level staring me down. Tons of accessible starch and maintains a great deal of separation, a perfect medium. The only minor issue was moisture content which was easily solved by adding a touch of water to wilt the popcorn.

Fuzzy Popcorn Koji
The koji thrived on the popcorn! The result was koji forward and not nearly as sweet as the Jasmine. Now I have to figure out what to do with it aside from eating it straight up.

On the next run, I decided upon steel cut oats because I was looking for a new breakfast flavor.

Steel Cut Oats with Koji Starter
After an overnight soak, the oats were ready for the koji without additional cooking. I did a quick 10 minute run in the steamer to make sure I killed off any unwanted beasties prior to mixing in the starter. The oats had a tendency to clump and stick. I did my best throughout the process to keep it fluffed up to make it koji friendly.

Steel Cut Oat Koji
The oats came out much better than I expected. The koji both fermented and sweetened probably due to the clumps creating a varied environment. A perfect breakfast cereal base.

Now go forth and kojify your favorite grains and legumes. Thanks to Branden and @fermup for developing a foolproof process. He was kind enough to put together a blog post that provides detailed instructions from start to finish. It also has a link to the incubator build. 

http://fermup.com/blog/how-to-fall-in-love-with-koji/

Please share your koji adventures with us to keep the ideas bouncing.

Sunday, August 10, 2014

Ogiri-Saro, Funky Sesame Paste

I had no idea what ogiri was until @geofflukas mentioned it after tasting a butternut squash seed tahini I made seasons ago. Ogiri is an African alkaline fermented seed paste used for umami. Time passed and I forgot all about it.

Mesquite Smoked Ogiri-Saro (Fermented Sesame Seeds)

Geoff called me a couple weeks ago to help him make lesser known fermented products from around the world. Of course, ogiri was at the top of the list. I did some research and discovered there isn't a whole lot out there on this flavoring agent. I was lucky enough to find a couple of references on Google Books that have pretty good detail on the processes.

Handbook of Indigenous Fermented Foods by Keith Steinkraus
Fermented Grain Legumes, Seeds and Nuts: A Global Perspective, Issue 142

I decided to try the Sierra Leone ogiri-saro first because it has the most readily available ingredient, sesame seeds. I put together a process based on what I read. It's actually very easy to ferment. All you do is boil the seeds, strain and wrap in a banana leaf. Then wait a week for the bacteria to do its work. Keep in mind the banana leaf does a wonderful job containing the ammonia smell. Do not open it up, stick your nose right on top of the seeds and take a whiff like I did. It's an awful smell.

Banana Leaf Wrapped Boiled Sesame Seeds


After the fermentation is done, hot smoke the packets for two hours. I decided on mesquite because I was sure it would stand up to the strong aroma. Another reason for smoking is to get the ogiri hot enough to kill the bacteria. This is followed by pounding into a paste with salt to taste. I figured it should be a little on the salty side to keep it shelf stable.

Finished Ogiri-Saro Paste

Ogiri-saro has a unique flavor that's well worth the effort. It's nutty, funky and has cheese notes. I'm looking forward to playing around with it. I'm also hoping that someone out there can help me source some so I can get a reference taste.


The Needs
  • 8 oz. hulled sesame seeds
  • 2-3 banana leaves depending on size
  • Butcher's/cotton twine
  • Medium size pan
  • Large size pot and towel to cover or ceramic crock with cover
  • Smoker
  • Mesquite chunks or chips
The Process
  • Add sesame seeds to 3 quarts of water in a pan
  • Bring to a boil
  • Simmer covered for 2 hours
  • Strain the sesame seeds to remove most of the water
  • Let the sesame seeds sit in the strainer until you're ready to package
  • Cut eight pieces of banana leaf approximately 12" long
  • Lay out four pieces in a row
  • Stack a second layer on each piece with the leaf fibers rotated 90 degrees
  • Split the sesame into four equal piles at the center of each of the leaf stacks
  • Fold each banana leaf stack around the seeds creating a disk/puck that is completely covered by the leaves
  • Tie the packet with butcher's/cotton twine
  • Stack the packets at the bottom of a stainless steel pot covered with a towel or a ceramic crock with a cover
  • Allow the seeds to ferment for 5-7 days at room temperature
  • Open a packet and check for an ammonia smell
  • Hot smoke the packets for two hours
Important: During the smoking process, monitor the temperature of the seeds to ensure it reaches the temperature to kill off the bacteria that drove the fermentation. I used 180 degrees F to be safe. 
  • Allow the sesame seeds to cool to room temperature
  • Pound the seeds into a paste and add salt to taste
Next up, raw sunflower seed ogiri.

As always, stay inspired and keep the ideas bouncing.

Thursday, July 24, 2014

Epazote Sherbet

Epazote is strong enough to power through a frozen application. It adds a flavor dimension that has no equal. Once you try it, you'll be addicted.

Epazote Orange Sherbet

Aside from the flavor depth that shines through, it's the seed texture that drives. I love the micro-bursts and did my best to get as much into the base as possible.

Epazote Seeds Sinking in Sherbet Base

The Needs
  • (2) 6" lengths of epazote cut from the top of a full plant 
  • Basic sherbet recipe and ingredients (I'm pretty sure it'll work with just about any fruit. Here's AB's recipe.)
  • Blender 
  • Coarse mesh strainer, standard should work, so epazote seeds will pass through
Infuse the Juice
  • Pull the epazote apart over the blender pitcher into short strands and drop them in
  • Pour the recipe required liquid juice over the epazote (If needed, add a portion of the milk.)
  • Blend on high until the epazote is fully incorporated/tiny bits
  • Strain the juice into a medium sized bowl
  • Use the back of a spoon to stir and smash the remaining epazote seeds through the strainer
  • Scrape the back of the strainer to get the stuck seeds into the juice 
  • Follow the recipe with the epazote mixture in place of the juice

If you'd like to see more sweet epazote ideas, read the Dulce de Epazote inception.

As always, stay inspired and keep the ideas bouncing.

Tuesday, July 22, 2014

Dulce de Epazote

I like to bring flavor discoveries to @meimeiboston to bounce ideas and experiment. I had been chewing on epazote every morning for a few days trying to decide what to do with it. I had savory on the brain until @jacquelinedole pointed us down a sweeter path.

Jacqueline's Blueberry Shortcake w/ Epazote Whipped Cream

What does epazote taste like? I find it hard to describe due to the complexity and prefer not to toss out words that would lead you in the wrong direction. I will tell you that it can be used to make tea. Just get some, taste it and understand why you can't live without it.

Sprigs of Backyard Epazote

One of our first thoughts was ice cream, but we weren't sure if the flavor would be muted. We both agreed that whipped cream was the way to go. I steeped two healthy 10" sprigs in one quart of cream to see how the flavor would take. After it came to room temperature, we tasted it. Simply amazing. It added wonderful depth to the rich dairy. By far, the best part was the flavor bursts of seeds and bits of buds. 

Epazote Suspended in Cream

I strained out the epazote while making sure the pops of flavor passed through and tasted the spent sprigs. They still had a good amount of flavor so down the waste not want not candied road we went. Jacqueline gave me the ratio using honey, but we couldn't find any. I happened upon some agave and couldn't have been happier.

Agave Candied Epazote & Bottom of the Pan Syrup
 
I added the epazote to the hot syrup and allowed it to cool for a bit. Then I pulled out the sprigs and arranged them on a wire rack. Of course, we had to taste the syrup. Freaking delicious! Soda was the next logical step. Jacqueline poured a lemon seltzer over ice and I stirred in the syrup. It was brilliant. Pulling out the carbonator and doing a proper soda is on our list.

Candied Epazote Syrup

Ingredients:
  • (2) 10" long, healthy sized epazote sprigs
  • 1/2 c granulated sugar
  • 1/2 c agave syrup
  • 1/2 c water
Instructions:
  • Add everything except the epazote to a small pan
  • Heat at medium, stir until sugar dissolves then bring it to 230F
  • Remove the pan from the heat
  • Above the pan, pull the epazote branches off the main stem
  • Rub the epazote between your hands to release the buds and seeds into the pan
  • Put the epazote into the syrup and submerge
  • Allow it to cool to room temperature
  • Remove the epazote sprigs and set them on parchment or wax paper
  • Pour the syrup through a coarse mesh strainer to remove the remaining large bits and allow the flavor pops to pass
Only eat the buds and seeds off the candied epazote because the stems are pretty tough.


As always, stay inspired and keep the ideas bouncing.

Saturday, July 12, 2014

Trail Mix Butter, The New PB&J

A month ago the idea of making trail mix butter popped into my head and I put it out there. @maxfalkowitz caught it and we bounced a few interesting ideas back and forth. The one that resonated with me was ice cream. Pure genius.

Trail Mix Butter Ice Cream with Honeycomb Candy & Smoked Molasses

Ok. What is this trail mix butter you speak of? It's simply processing your favorite snack combo of nuts, dried fruits and candy coated chocolate into a spread. However, the result is far from simple. The butter is a harmonious marriage of all the ingredients that's freaking delicious. A complex flavor bomb best described as peanut butter and jelly on crack.

Trail Mix Butter on Rye

Now that I had the key ingredient for the ice cream, I needed some guidance. I posted Max who supplied a few killer peanut butter ice cream recipe options. I figured all I had to do was swap out PB for TMB. The resulting frozen delight was amazing. The base was infused with every single flavor component of the trail mix. The tiny bits of dried fruit, peanut and candy were wonderful flavor and texture pops. After an overnight freeze, it had a nice soft serve consistency. Thinking less sugar on the next run to harden it up a bit.

Trail Mix Butter Ice Cream Churning

Trail Mix Butter (TMB)

Ingredients
  • 60g dried black mission figs
  • 60g flame raisins
  • 100g smoked dry roasted peanuts
  • 48g candy coated chocolates
  • 48g candy coated peanut butter pieces
Take all the above (or your favorite trail mix) and spin it in a food processor until you get a paste with tiny chunks. Reference the TMB on rye picture above. Yields more than the cup required for the ice cream.

Trail Mix Butter Ice Cream

As always, stay inspired and keep the ideas bouncing.

Friday, July 11, 2014

Hot Flame Raisin Clementine Bitters

I never miss an opportunity to char fruit over screaming hot coals after I'm done grilling. The caramelization and scorched bitter bits is an unforgettable combo. 

I saw clementines on the table and flamed citrus peel immediately came to mind. I started splitting them to put on the grill and saw a pint of flame raisins. Figuring raisins in clementine juice would bloom when intensely heated, I jammed one raisin into each segment of a few halves. Onto the grill they went.

Charred Flame Raisin Packed Clementines

Success! I ate one skin and all. It was a killer complex combination of flavors and textures. The raisins transformed into bursts of jelly and the skin tasted like smoky orange bitters. It was so good I couldn't help but bang out a cocktail. I grabbed the Boston shaker and muddled a packed clementine into a Negroni. Strained it into a glass of ice, added a touch of seltzer and kicked back to enjoy.

So the next time your grill is still hot, go ahead and put any fruit on and taste what happens.

As always, stay inspired and keep the ideas bouncing.

Friday, July 4, 2014

Charred Oak Barrel Seasoned Steak

I recently received a generous gift of vinegar barrel shavings thanks to @r8cheljane and @minus8vinegar. I've been brainstorming ideas on how to use them. Smoking was too obvious...

I love direct contact coal roasting after all is said and done with a grilling/smoking run. Nothing beats tossing root vegetables on, shutting the cover and harvesting deliciousness the next day. However, it sacrifices a significant amount of the product, which gets incinerated. Then I thought why not use the shavings as a sacrificial insulator? I was sure it would provide wood fired flavor to boot.


Oak Barrel Shaving Pressed Sirloin

I pulled a sirloin tip directly out of a marinate and pressed oak shavings as if I was breading. The wet coating was enough to adhere and soak the wood. I placed the steak directly on hardwood coals for 4 minutes, flipping every minute.


 Charred Wood Shaving Steak Tip

The result yielded flavors of a wood fired steak with hints of smoke. It was pretty easy to get the charred shavings off. A traditional wood grilled crust didn't happen and that's okay. This method has serious potential and deserves further investigation.

As always, hope you're inspired to create and keep the ideas bouncing.

Monday, June 23, 2014

Rhubarb Tinted Glass Candy

I still can't get enough rhubarb. I've been tasting it practically every day for the past couple of weeks and brainstorming ideas. How do I maintain the brightness and punch? What acidic ingredient can it replace? Don't overlook the crunch. So much potential and I'm sad the season is practically over.

In the past, I've used the microwave to make instant lollipops driven by citrus and vinegar. It only made sense to bridge this application with the tart stems.


Transparent Rhubarb Candy
The first run of rhubarb candy yielded a lovely fruit leather, but it wasn't quite what I was looking for. I attempted to remove more juice from the thin slices.


Rhubarb Candy Dome
I patterned the sweetened rhubarb on a cooking sprayed bowl to form a sweet and sour shell.


Carbonated Rum Cake on Rhubarb Leather
The liquid content was still too high so it didn't maintain shape. Regardless, it went well with carbonated rum cake, red bean malted milk foam and fresh rhubarb.


Rhubarb Leather

Note: Microwaves vary so you may need to alter durations and power settings
  • Slice rhubarb as thin as possible on a mandoline if you have one
  • Dry the rhubarb by compressing a single layer between paper towels
  • Cut out pieces of parchment paper the size of a dinner plate
  • Lay out slices rhubarb on parchment 1/2" apart
  • Microwave in 20 second increments until most of the juice is driven out
  • Dredge the rhubarb in granulated sugar
  • Lay out the slices on a new piece of parchment 
  • Microwave in 20 second increments until the sugar caramelizes
  • Allow it to cool to room temperature 

As always, keep the ideas bouncing so we can all benefit.

Monday, June 16, 2014

Rhubarb Jam, Sweet Savory Sensation

Last year I made a killer rhubarb chive flower IPA jam. Every flavor element harmonized and I probably ate a pint throughout the cooking process. It danced on the sweet savory line and was amazingly versatile. I put it on everything...

Stuck on gin, I decided to swap out the IPA this year. I was blown away once again.

Rhubarb Chive Flower Gin Jam Started

Things to consider:
  • Use sugar sparingly so you can taste all the elements
  • Put it on and in everything sweet or savory
  • Serve it at any temperature
  • If you're making a big batch, separate portions out at different cook times
  • Mix uncooked elements of the jam back in at the point of use

I hope this inspires you to jam with rhubarb. Please share what you come up with so we can keep the ideas bouncing.

Tuesday, June 10, 2014

Vinegar Reduction Gone Right

I'm working on a vinegar chewing gum. The difficulty with using straight vinegar is that the flavor and acidity concentration is not enough to shine through the base. Inspired by @r8cheljane, I decided to go with a vinegar gel center. I felt that a simple reduction would be a good start.

Spoon Suspended by Reduced Vinegar
On the heat, it was where I wanted it. Cooled down, not so much.

Pulled Concord Vinegar
It was like taffy so I stretched and twisted it for fun.

Vinegar Gum with Vinegar Reduction Center
The reduction spreads well and worked wonderfully between two layers of ice wine vinegar chewing gum.

There's lots of potential here. I plan on trying a "spun sugar" vinaigrette. What are you thinking?

Monday, June 2, 2014

Marrying Maple with Refreshing Rhubarb

Rhubarb deserves better treatment than just pie or jam. Nothing beats the tart crunch of a freshly cut stalk from the garden. Granulated sugar dipping is great for a quick fix but has limitations. Infusing syrup into rhubarb is the way to go.

Maple Infused Rhubarb
This yields both maple infused rhubarb and rhubarb infused maple. 


Rhubarb Infused Maple Infused Rhubarb
Continue to reuse the infused syrup to play with concentration.


The Process
  • Fill a cream whipper to recommended capacity with thinly sliced rhubarb
  • Cover the rhubarb with any syrup
  • Double charge the canister with whatever you have
  • Refrigerate overnight

As always, I hope this idea inspires you to create. Please share what you come up with. 

Saturday, May 24, 2014

Sherbet Shines with an Unlikely Partner

Take sherbet to the next level by replacing the citrus with quality vinegar. It adds wonderful depth of flavor that shines through.

Cola Concord Grape Vinegar Sherbet Float

I am patiently waiting on summer fruit to get here after a late start. In the meantime, I continue to seek bright and refreshing ideas to keep cool. Sherbet filled the immediate void. It's a wonderful combination of everything that's great about ice cream and sorbet. Untapped potential worth investigating. Give it a shot and you'll understand.

Guidelines for hacking a sherbet base
  • Replace the lemon juice with a delicious vinegar of your choice
  • Replace the dairy with a mix of equal parts cola and sour cream
  • Start with half the amount of sugar
  • Adjust sugar and vinegar to taste after the base is mixed
If you don't have an ice cream machine, try the ChefSteps dry ice process. It's a good time.

As always, please share your ideas so we can all benefit.